Throughout this project I aimed to capture the essence of
movement through the use of both digital and conventional photography. The way
in which I captured and displayed the movement which I captured for the digital
part of this project was to create a flip book. To do this I used the
continuous shutter setting on my camera to capture a large number of
photographs of things as they moved. This proved to be a fantastic way to
capture these images as when the flip books were put together, they run nice
and smoothly and work well as flip books. I am happy with the way this part of
my project turned out. In addition to this, I also had to capture movement
through the use of conventional photography which included the use of film
cameras. While doing this project, this was the first time I had ever used film
a film camera and at first I found it slightly frustrating that I could not
view the image once I had taken it as I have got so used to with the use of
digital camera with full colour displays which I am used to dealing with. As I
was using film cameras as part of this project, this meant that I had to
develop my prints in the dark room. As it was my first time with a film camera,
it was also my first time within the dark room and although I found it slightly
tricky to get the hang of at first, I really enjoyed my experience in the dark
room. By doing this project I have learnt a lot of new skills and techniques,
one of which being how ISO, apertures and shutter speeds work together in order
to control the amount of light which is let into the camera. Another thing
which I learnt through this project is how to use a conventional camera and how
to develop prints in a darkroom as I did not previously know how to do this.
One way in which I could have organised my time better throughout this project
would be to upload each of tasks to my blog as I complete them rather than all
in one go at the end of the project as if I fall behind slightly with the write
ups for the project, this process proves lengthy. My favourite part of this
project was working within the dark room as this was a new experience for me. I
really enjoyed experimenting with different length exposures and then watching
my image appear in front of my eyes as I developed it. That said, I did have a
couple of problems at the beginning of my darkroom experience. This was only
due to not exposing the photosensitive paper to the light image projected from
the enlarger for a long enough period of time. This was soon rectified so it
did not prove to be a massive problem.
Showing posts with label unit 35. Show all posts
Showing posts with label unit 35. Show all posts
Tuesday, 9 December 2014

Darkroom Artist Research
Diane Arbus
Diane Arbus was an American photographer from
the 1940’s through to the 1970’s who is known for her black and white prints of
people who were different to what society considers to be the ‘norm’ such as
the likes of giants, dwarves circus performers and so on. Diane Arbus was
creating her photographs starting in the 1940’s this means that her photographs
were shot on black and white film and she developed her photographs within a
black and white darkroom as this was the only option for her during this time
as colour photography was not widely used at this time. Unfortunately, Diane
Arbus took her own life in 1971 as a result of depression and as sometimes
happens, her death increased the interest in her work and a year later her work
was displayed at the Venice Beinnale and millions of people saw her work
featured in traveling exhibitions over the following few years. Here are some
of Dianne Arbus’ photograph that I found interesting.

This photograph shows a person with a clear abnormality
which is that the man in the photograph is quite a lot larger than the average
sized person. This would mean he would have been known as a ‘giant’ by a lot of
people and not seen as the ‘norm’. I like this photograph because I feel that
it has a message behind it. The message being that even though this man would
not be considered the ‘norm’ by a lot of people, the two other people in this
photograph are still accepting of him. This is shown as they have welcomed him
into their home. I think that another meaning behind this photograph is to show
the sheer size difference between the two average sized people and this larger
man and the purpose of this photograph is to showcase the fact that people who
have conditions such as his do exist and should not be hidden away from media
and art forms and that people with abnormal conditions are equal to the rest of
society.

This
is a photograph of a child holding a model grenade while stood in a park. I
chose to include this photograph as I found it very interesting as there is
such a contrast within this photograph. This contrast being that of the
innocence of a young boy and the violence and destruction that the replica hand
grenade represents. As this photograph is black and white, I feel that this
adds extra atmosphere to the photograph highlighting the vast difference
between the innocence and violence suggested within the image.

This is another photograph taken by Diane Arbus and it
features a pair of identical twins. I chose to include this photograph as I
thought it was such a simple photograph but it captures the ‘abnormalities’
which Arbus captured a lot within her work very well as identical twins are not
all that common. I like the way the two girls in this photograph are positioned
in the centre of this photograph and they are both dressed in the same way
making the photograph nice and symmetrical. The facial expressions of these two
girls differs slightly therefore if I was to shoot this photograph, I would try
my best to make sure both of the girls also had matching facial expressions as
this would make the photograph even more symmetrical than it already is.
Ansel Adams
Ansel Adams was an American landscape
photographer who produced black and white photographs starting in the 1920s as
in 1921, Ansel Adams produced his first photograph with the 1930’s being a very
productive decade for him as he developed as a photographer and produced a lot
of his work within this decade. Ansel Adams had a very successful career
spanning around 60 years in which time he produced some truly beautiful
photographs. As Ansel Adams was producing photographs as of the 1920s, this
meant that he specialised in black and white photography as, at the time, this
was all that was available to photographers. I feel that the black and white
photographs produced by Ansel Adams are very beautiful and they capture a lot
of atmosphere while the majority of his photographs remain simple yet
effective. Here are some of Ansel Adams’ photographs which I find particularly
nice

This photograph is called Mount Williamson. I chose to
include this photograph as I love the way in which this photograph is composed
with the rocks filling 2 thirds of the image and the mountains drenched with
sun beams gracefully fill the top third of this photograph. This photograph is
very appealing to look at.

This photograph is called Rose and Driftwood. I chose to
include this image as I love the simplicity yet intricacy of this photograph.
This photograph is such a simple and beautiful idea and I love the contrast of
the gentle and pure rose against the intricate pattern of the driftwood which
it lays on. I also really like the composition of this photograph as the rose
is situated just off centre. This allowed the entire rose to be in shot while
still being able to show off the pattern of the driftwood which may have been
lost of the rose was situated perfectly central.

This photograph is called Vernal Fall. This photograph shows
a waterfall and the surrounding area. I chose to include this photograph as it
differs quite a lot from the other two photographs which I have included as the
previous two images were quite simplistic however there is a lot going on
within this image. I like this photograph because although there is a lot going
on within this image, the detailing is not lost and you can still see the rock
detail on the mountain behind the waterfall.
Darkroom timeline
I first got my strip of negatives back from
Keith after he had processed my film for me
2)
I then cut the long strip of negatives into
smaller strips which were 6 frames long
3)
I then took my negatives to the dark room
4)
Once in the dark room, the red safe light was
turned on to ensure the light sensitive paper does not get fogged
5)
The first thing I did when I was in the dark
room was make sure the enlarger and easel were set correctly. I set the easel
to 7.5 inches by 10.5 inches, I set the enlarger to grade 3 and set the
aperture on the enlarger to 5.6.
6)
I then removed the negative carrier from the top
of the enlarger and inserted my strip of negative into it then returned It to
the top of the enlarger.
7)
I then ran the enlarger in order to make sure
the image I would be printing would be the correct size and in focus. I
adjusted the height of the enlarger and used the focusing wheel on the side of
the enlarger to ensure that the image filled the space where the paper will be
placed and is in focus
8)
Once I was happy with the image, I then turned
off the enlarger and set it so it would run for 3 seconds at a time then turn
off automatically. I tested this before getting the paper to make sure the
enlarger was set up properly.
9)
I then got a small piece of light sensitive
paper in order to carry out a test print on it.
10)
I covered most of the paper with a piece of
thick card then ran the enlarger. I
moved the card slightly then ran the enlarger again. I repeated this process
until I reached the end of the test paper.
11)
I then took the paper and placed it in the
developer tray for 1 minute and kept the developer moving over the developing
image for the duration
12)
I then moved the paper from the developer to the
stop with the tongs provided, I left it there for 30 seconds, again keeping the
stop fluid moving over the paper.
13)
After this I moved the paper to the fix tray and
kept this moving over it for another 30.
14)
After this I moved the newly printed photograph
to the water bath to rinse for 10 minutes
15)
I then took the photograph out of the water bath
and viewed it in day light in order to determine the correct exposure time for
that image.
16)
I then repeated this process several times until
I found an image with an exposure time which I liked.
17)
Once I had found an image and exposure time I
liked, I set the enlarger to run for that exposure time and made sure I had
focused the image correctly
18)
I then got another test piece of paper and ran
the enlarger for the full amount of time over the entire piece of paper.
19)
I developed this image in the same way, I placed
it in the developer for 1 minute, then in the stop for 30 seconds then in the
fix for a further 30 seconds then in the
water for 10 minutes.
20)
I then viewed this image in actual light. I did
this so I could see what the final print would look like if I was to carry out
the final print with the settings as they were
21)
I repeated this process until I was happy with
the results I was getting.
22)
Once I was happy with my test prints I then
checked the boarder guide plates were set to they would give a boarder of 0.25
inches all the way around the edge of the print.
23)
Once I had checked that everything was right and
I was happy with the way everything was set, I then got a large sheet of paper
for my final print and placed it on the easel and made sure it was liked up
correctly.
24)
I then ran the enlarger for the amount of time I
decided was the best for that image.
25)
Then I placed the print into the developer for 1
minute, then in the stop for 30 second, then in the fix for another 30 seconds
then in the water for 10 minutes
26)
After my print had been in the water for 10
minutes I then removed it and left it to dry.
Darkroom research
A darkroom is a room which is made completely dark for the
purpose of developing photographs with the use of light sensitive photographic
paper. Darkrooms are used for creating photographs from the negatives which are
produced from the reel of film used to take pictures on conventional cameras.
When working within a colour dark room, the room must be completely dark as the
paper is sensitive to all types of light however when working within a black
and white dark room, a red safe light must be used for vision as the paper for
black and white photographs is not sensitive to red light but it is sensitive
to all other types of light.
The equipment found in a dark room usually consists of an
enlarger and a processing bay. The enlarger is used to turn the small negative
into the large final print. It does this by working in the same way that a
projector works. You insert the negative you wish to you into the negative
holder, place the negative holder into the enlarger and the enlarger projects
light through the negative projecting the image onto the board below. This
light image will later be transferred onto the light sensitive paper and this
is what created the photograph.
The processing bay in the dark room consists of 4 trays
containing 4 different liquids which all do different things in order to
produce the photograph. The first tray in the processing bay contains the
developer this initially reveals the image on the paper. The second tray
contains the stop which stops the developing process. The third tray contains
the fix which stops the photograph from fading over time and the fourth and
final tray contains constant running water to rinse the photographs after they
have been through the developing process.
During my research I found a list of health and safety rules
to be followed when working these are as follows:
Darkroom General Safety Rules:
o
Limit access to the darkroom. Only approved persons should be allowed to
work in the room.
o
Practice good housekeeping. Keep the work area clean and uncluttered to
prevent tripping over hazardous chemical bottles.
o
Separate the wet and dry areas.
o
Always segregate chemicals. (Don’t store acids near reducer).
o
Use the least toxic chemicals available. Avoid cyanides, heavy metals
and developers containing pyrocatechol or pyrogallol when possible.
o
Do not store chemicals on the floor.
o
Do not eat, drink or smoke in the darkroom.
o
The darkroom should be well ventilated.
o
Wear appropriate protective equipment whenever possible, such as gloves,
goggles, etc.)
o
Always wash hands with soap and warm water after working with chemicals.
o
Know how to use emergency equipment prior to an actual emergency.
o
Always Add Acid to water, never water to acid. (Remember ‘AAA’)
o
Keep a spill kit in the darkroom.
o
Do not use paper towels or saw dust to clean up acid spills as this may
cause a fire.
o
Pregnant women should not be exposed to powdered developer.
o
Store all chemicals in locations that will minimize the chance of
breakage and splashing.
o
Label all containers.
o
Keep all containers and trays closed or covered when not in use to
prevent the release of toxic gases.
o
Do not wash any chemicals down the sink (exceptions noted below).
• All spent chemicals should be placed into an appropriate waste container. (A container the same as the one the chemical was originally shipped in is best).
• All spent chemicals should be placed into an appropriate waste container. (A container the same as the one the chemical was originally shipped in is best).
I found this list of health and safety rules on the website http://www.lomography.com/

flip book analysis
The first flip book I created shows Nicole jumping from a
wall. This flip book starts with Nicole standing on the wall, she then jumps
off of the wall, she then appears to jump back onto the wall. This then
repeats. To create this flip book I had my camera on fully automatic setting
meaning that the shutter speed, aperture and ISO were all controlled for me. As
the camera which I was using was fully automatic, this was my only option,
however in an ideal situation I would have been able to alter these factors
manually. For this flip book I asked Nicole if she could jump from the wall in
City Park while I photographed her using the rapid shutter setting on my camera.
I used this setting as it captures any movement at each stage meaning that even
fast moving objects are captured so that each photograph taken only differs
slightly from the last and this is the way that flip books work the best. An
effective flip books images are similar with minor changes between each image,
this makes for a flip book which flows nicely. Once I had taken these images, I
then contact printed them and printed this set of photographs 4 times. Once I
had cut all of the images to size, I
created the flip book, reversing the order in which the imagers were arranged.
This gave the illusion of Nicole jumping on and off of the wall. I arranged the
flip book in this way as I thought it would add a different spin to the flip
book and make it slightly more interesting. The completed flip book consists of
around 80 photographs and I found that this is a good number of images to use
when creating a flip book as the flip book is not too short and there are not
too many images that the flip book becomes hard to flip. I am happy with the
way this flip book turned out as I like the way the sequence of images is
repeated but in reverse at stages throughout the flip bo0ok. This gives the
illusion that there is extra movement which did not actually occur.
The second flip book I created shows the feet of a man
walking through city park. I created this flip book in the exact same way as
the last one, my camera was on a fully manual setting and I used the continuous
shutter mode in order to capture the movement of the mans feet as he walked.
This flip book consists of 40 images and I feel that this Is not enough as the
flip book seems very thin and does not seem to flip through the images in the
best way that it could. When flipping through this flip book, I feel that it
reaches the end far too soon. To correct this I would have to increase the
amount of images which I used. A way of doing this would be to shoot with the
continuous shutter for longer so I would have more images to work with. Another
way I could do it would be to reverse the order of the images as I did with the
previous flip book. I am not as happy with this flip book as I am with the
first one I made as I feel that it does not flow as nicely and is not as nice
to view. If I was to re do this flip book I would make sure I have more images
to work with.
flip book contact prints
Once I had taken the photographs for my flip books based on the ideas I previously
generated, I then contact printed the images ready to be printed and made into
the flip books. Here are the images from the photo shoots I carried out for
creating my flip books.


flip book ideas
Flip book ideas
I was then asked to generate at least 2 different ideas for
creating my own flip books. Here are the ideas I came up with.
Idea 1:
Pigeon flying or walking
Find a pigeon walking around or flying and use the
continuous shutter mode on my camera to capture its movements. Print the images
then put them together to create the flip book.
Idea 2:
Somebody jumping
Ask someone to jump off a bench and use the continuous
shutter feature on my camera to capture this movement. Print this set of images
4 times then with each set of images, alternate the order in which the imagers
are arranged. This will mean that when the flip book is assembled it will look
like someone is jumping down from the bench then back onto the bench, then back
off, then back on again.
Idea 3:
People walking around City Park
Set up camera in city park and use the continuous shutter
feature as people walk around City Park to capture the movement of the people
walking.
Idea 4:
Hands moving around clock face
Take photographs of a clock so it looks like one photograph
has been taken every minute. This will make it look like the clock is turning
quickly.
flip book research
For this part of the project I was asked to research flip
books. Here is what I found out about flip books.
Flip books are a combination of images which differ slightly
from each other which are put together and intended to be flipped from one
picture to another to show movement and create a simple animation in the form
of a book without the use of a machine. Flip books were very popular in the 19th
and early 20th century but they are still produced today and they
are known by a veriety of names such as flick books, flip movie, fingertip
movie, living picture book or hand cinema.
Here are some examples of flip books that I found during my
research. These flip books are all flipbooks which have been made up entirely
of drawn images rather than photographs and they all show movement in a
creative way.

This is one of the flip books I found whilst doing my
research. This flip book shows the Cheshire Cat disappearing as the flip book
progresses in order to finally end with just the Cheshire Cats smile at the end
of the flip book. I like this flip book as it is creative in the way it has
been drawn and put together.

This
flip book shows a geometric shape rotating and moving as the flip book
progresses. This flip book is a simple idea as the shape is just rotating
however the flipbook is effective and creative. I like the way this flip book
is simple yet the design of the geometric shape is intricate making the flip
book creative

This is another flip book I found whilst carrying out my
research for flip books. This flip book shows the words “my heart beats only
for you” appear as the flip book progresses. After the words appear, an
illustration of a young man appears with a beating heart. I like this flip book
as I like the originality and creativity of it. This flip book is drawn rather
than made up of a series of photographs and the illustrations within this flip
book are nice and consistent making for a smooth flip book.

This flip book is another drawn flip book. This flip book
shows small stick men bringing the lettering “I <3 U” into view throughout
the flip book. This flip book looks as though it has been drawn on a stack of
post-it notes. I think this is a good way to create a flip book however it
could potentially cause problems if someone of the sticky notes become
unattached from one another. I like this flip book as it is a simple flip book
but the illustrations are consistent making a smooth flip book which flows
together nicely.
Painting with light


Once I had experimented with the use of different shutter
speeds, I was asked to create some photographs by ‘painting with light’.
Painting with light is when you use a long exposure on your camera then use a
light source such as a torch or glowstick to create ‘paintings’ . this can be
done in most situations but it usually works best with minimal to no light
other than the light source you are using to create your light paintings. Light
paintings are created when you move a light source in such a way that you
create a pattern or drawing in front of a camera which has been set to have a
long exposure. To create my light paintings, I was in a group with 2 other
classmates, Nicole and Anzelika. As a group we experimented with different
camera settings to try and achieve the best light paintings possible.
Here are the light paintings we created as a group.

This
is one of the first light paintings we created. We had the camera set to have
an f/8 aperture, the ISO was set to 100 along with a 10 second shutter speed.
As this was one of our first light paintings, this was not the most successful.
The shutter speed, aperture and ISO were set correctly but the subject of the
image is unclear as it proved difficult to create a neat picture the first time
we tried as we could not see where we had painted.

For this light painting we kept all of the camera settings
the same as the last one. The only thing we changed about this image is how we
created the image. Before we created this image, we thought about how we wanted
it to look and tried to recreate what we had thought of. This image shows a heart with surrounding
detailing. I feel that this image worked well however, there was a little too
much surrounding light and the background is not completely black as I would
have liked. If I was to reshoot this image I would try to get complete darkness
when creating the light paintings.

For
this image we changed the ISO on the camera to 400 as we felt that the light
emitted from the glowsticks we were suing was not bright enough and not being
picked up well enough by the camera. To try and solve this problem, we tried
increasing the ISO of the camera which would let more light entre the camera.
This did not go to plan as there was too much surrounding light meaning that
this light was also picked up by the camera making the image not as dark as I
would have liked. The only way to solve this problem would have been to
eliminate all other light sources from the room, however, I was working in a
studio with various other groups doing the same thing so eliminating all other
light would have been impossible

After quite a few different attempts at creating a
successful light painting, the three of us in my group decided to try and paint
a flower using different coloured glow sticks for each of the parts of the
flower. For this light painting we changed the ISO to 200 as 100 was not
letting in enough light from the glow sticks and 400 was letting in too much of
the surrounding light and I feel that this was a good compromise. Each of us in my group took on a role in
creating this flower, I created the centre, Nicole drew the petals and Anzelika
drew the stem of the flower. This worked well as the light emitted from the
glow sticks to create this image is nice and vibrant, howver there is still too
much surrounding light meaning there are unwanted aspects of this image such as
the fact that I am visible within the photograph. Ideally, this image would be
completely dark with just the image of the flower in the centre.

After we had used the glow sticks to create some light
paintings, we decided to try out a different light source. This light painting
was created using a torch on a mobile phone rather than glowsticks. This method
worked slightly better than using the glowsticks as the light from the torch
was much brighter meaning that the camera focused more on this light rather
than the surrounding light making the background appear darker. The image
created within this light painting is a lot clearer than those in which we used
the glowsticks giving the torch a big advantage over the glow sticks, however,
the advantage which the glowsticks have is that they come in a variety of
colours which can make for more interesting images which include more colours
but they are not as bright as those created using torches.
Task 1b - shutter speed practical research.


In order to carry out this research, I went out and took
some photographs exploring the effect changing the shutter speed, ISO, and
aperture has. Here are all of the
photographs I took whilst carrying out this research.


This is a photograph I captured while in City Park of Nicole
jumping from a bench. For this photograph I used a fast shutter speed of 1/125
an aperture of f/11 and an ISO OF 800. In this image I aimed to freeze the
movement rather than capture it as a blur across the image. In order to freeze
the movement this meant that I had to increase the shutter speed. Increasing the shutter speed reduced the
amount of light which is let into the camera through the lens as the shutter is
open for a much shorter period of time, this means that this ISO and aperture
had to be changed accordingly so I changed the ISO to 800 in order to let more
light into the camera, I then adjusted the aperture accordingly to balance out
the light levels in the image. I am happy with the way this photograph turned
out as I like the way the movement is frozen and Nicole has been captured as
she is in mid air. In addition to this, I am happy with the way the photograph
is lit as the colours within the image are nice and vibrant and the photograph
is not overexposed and it is not underexposed.


Task 1A - initial research
For task 1a I was asked to research movement within
photography. I did this by using both the library and the internet to find
contemporary and historical photographers and examples of their work.

This photograph is called Flash and it is by Michael Snow.
This is one of the photographs I found whilst carrying out my library research.
This photograph was taken in 2001 meaning that this is a contemporary piece.
This photograph shows a couple sitting across from each other at a dinner table
whilst the glassed and bread rolls on the table have been thrown in the air by
what looks like it may have been a gust of wind. I came to this conclusion as
the bread rolls, wine glasses and the womans hair have all been moved
simultaneously. This photograph captures this movement by using a fast shutter
speed allowing the items which have been thrown into the air to be captured in
mid air, freezing the movement. This photograph is in colour and looks as
though it has been taken with a digital camera.

This photograph is called ‘The kiss at the Hotel De Ville’
and it is by Robert Doisneau. This is another of the photographs I found whilst
carrying out my library research. This Photograph shows a couple kissing in the
middle of the street while other people in the street carry on their daily
business and continue to walk down the street. This photograph is a historical
piece and had been captured in the conventional way using a film camera with
black and white film. I know this because this photograph was taken in 1950 and
digital cameras did not exist at this time so all photographs which were
produced at this time were captured on film cameras. The movement in this image
has been captured by using a long shutter speed of around 1 second or so. I
know this because the couple kissing who are the centre of the photograph are
perfectly in focus while the people around them who are walking down the street
going about their daily business are blurred as they move.

This is a photograph which I found whist carrying out my
internet research. This photograph was taken by Chris Tostevin-Hall. This image
is composed of three different photographs layered on top of each other. The
three photographs which this image is composed of have all been taken with
shutter speeds ranging between 1.6 seconds and 25 seconds, this is what gives
the water crashing over the rocks a misty effect. This photograph is a
contemporary photograph as it was taken in 2006 and it has been taken with a
digital camera.

This is a series of photographs I found whilst carrying out
my internet research. This piece is called The Horse In Motion and it is by
Eadweard Muybridge. This series of photographs, when viewed one after another,
shows a horse galloping. This piece shows motion through a series of
photographs rather than through the use of long exposure. This piece showcases
historical, conventional photography. I know this because these photographs
were taken in 1887 meaning the only option when taking photographs was to use a
film camera with a reel of black and white film.
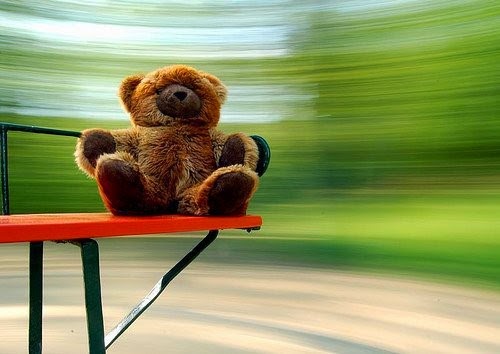
This is another photograph I found whilst carrying out my
internet research. I could not find the camera settings for this photograph,
however i did find that this photograph was taken digitally rather than
conventionally. This photograph was taken with a long shutter speed and it is
of a teddy bear spinning on a roundabout. This photograph is a good example of
Panning. This is because the subject of the photograph is moving with the
camera meaning that the subject appears to be stationary while the background
of the image which isn’t moving appears blurred.
Subscribe to:
Posts (Atom)